Editor’s note: This post was originally published on the BIMscape blog and re-published here with permission.
In this Autodesk Revit tutorial we are going to take a look at Printing your Views and Sheets. If you’d like to watch the video version of this tutorial first, simply click in the box below
Once you have composed your Sheets by placing Views onto them, it is time to print them. This is the easiest part! If you are coming to Revit from AutoCAD, I don’t need to tell you about scaling ViewPorts, LineType Scale, PlotStyle Tables., etc. Forget all that! There is none of that nonsense with Revit. What you see on screen is what you’re going to get when it is printed.
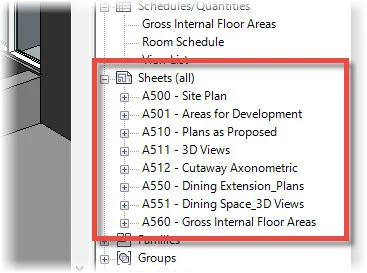
Check your Sheet List in the Project Browser to ensure you have all of your Sheets ready for printing:
Switch to the “File” menu (1, below), choose “Print” from the bottom of the menu (2 / 3, below)
The “Print” dialogue box opens. The panel is split into 4 main areas- I’ll take you through these now
Printer Setup: Make you choice of output device here
Print Range: The most important part of the panel. More on this in a second
Options: Decide on the number of copies you need
Settings: Set defaults for paper size, orientation, etc. You can even save the configuration for use at another time
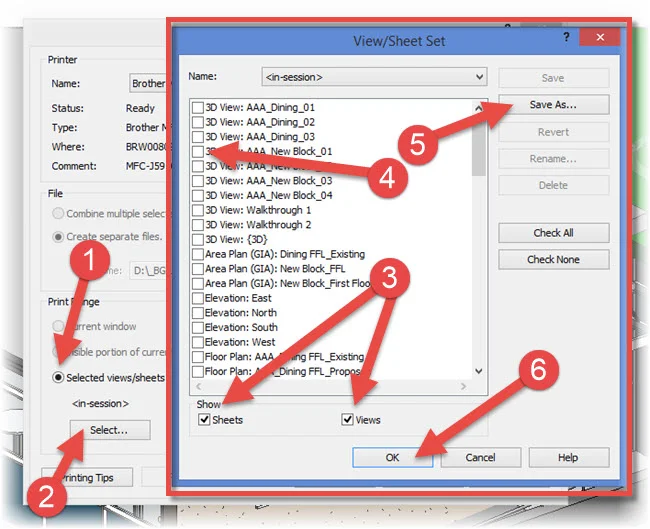
OK, so back to the “Print Range”. This is where we choose exactly WHICH Views and / or Sheets will be printed. Make sure that “Selected Views / Sheets” is selected (1, below). Then hit the “Select” button (2, below). The “View / Sheet Set” panel will then open. Choose whether you want it’s list to display Sheet and/or Views (3, below). Put a check against the View / Sheets you wish to print (4, below). Save this selection for use at another time (5, below). And finally hit “OK” to print your chosen Views and /or Sheets (6, below)….
Key Points
Revit is fully “What you see is what you get”
There are no PlotStyle tables to configure
You can save you selection set (or views / sheets) for easy retrieval at another time
Editor’s note: This post was originally published on the BIMscape blog and re-published here with permission.


